Life 24,000 Piece Puzzle – Completed
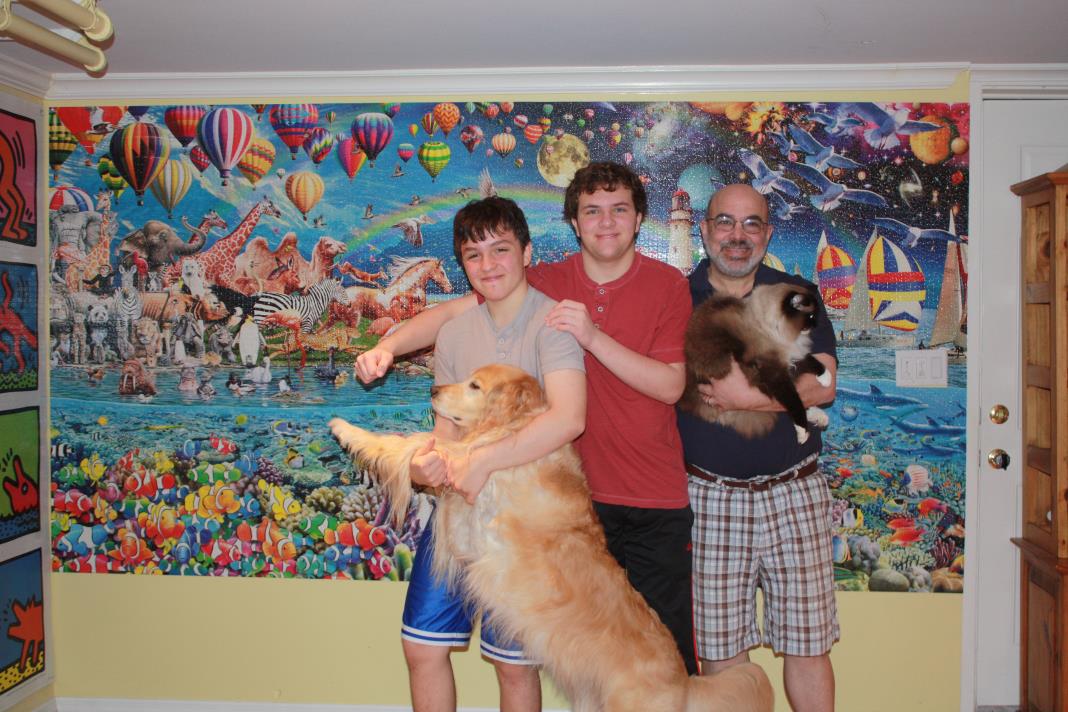
On March 23rd 2014, I completed the Life 24,000 piece puzzle after about 3 months of work. The puzzle was a Christmas present and my second really big puzzle. I completed the 32,000 piece Keith Haring Double Retrospect puzzle about two years ago. That one took about 5 months.

Life 24,000 piece Puzzle
I am the one holding the cat.� Jonathan is holding the dog and Robert is holding Jonathan.� Jonathan probably put in about 100 pieces.� I let Robert put in the last one.� The dog and cat did not put in any :-), but the cat lost two�pieces.���I let them get in the picture anyway.� When I first started the project, I left it uncovered at night, not realizing that these loose puzzle �pieces were�perfect “cat toys”.�I found several on the floor and a few scattered around the house, but two never turned up. Chalk it up to experience.
Here is a slightly bigger version of the completed puzzle.

Life 24,000 Piece Puzzle Complete
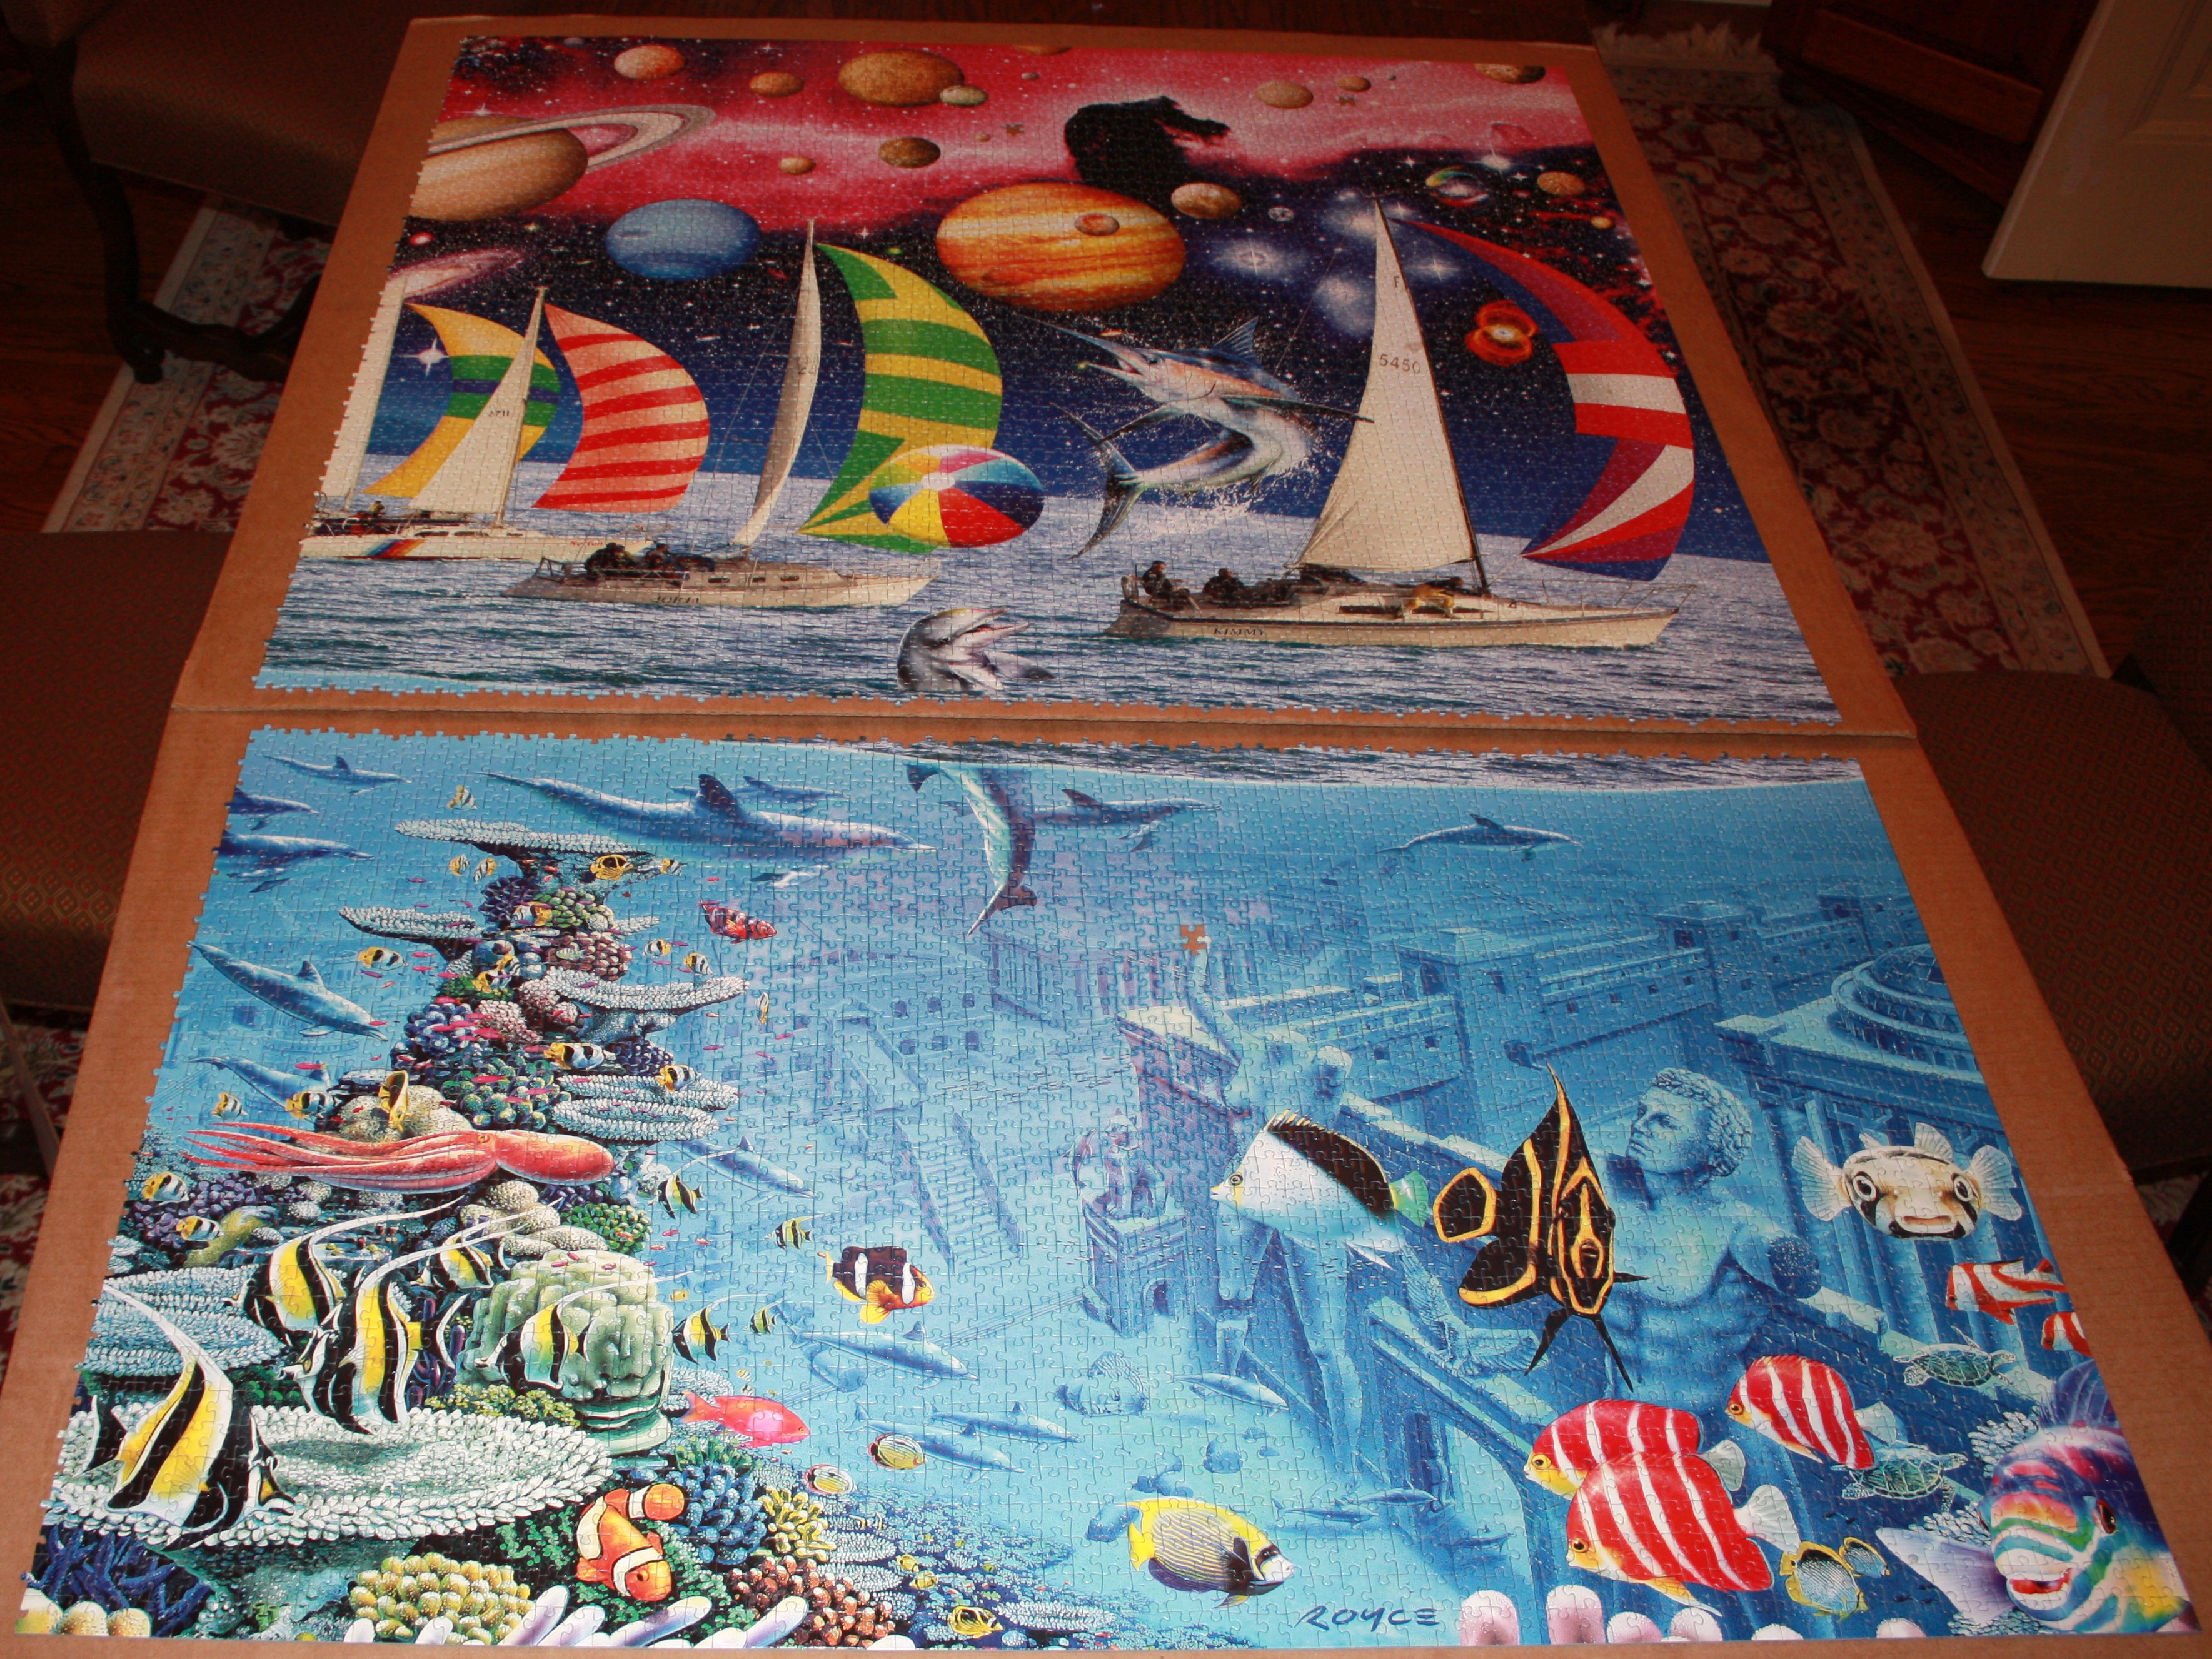
The puzzle arrived on November 29th, 2013 and I opened it up that weekend.� In the box were four large bags of pieces (about 6,000 pieces each.�� I decided to start on section “D”, the rightmost section.� After about 2 weeks, I was able to complete the top part of this section.

Life 24,000 piece puzzle – section D – top
The puzzle then sat for� a� few weeks, while we were away for the Christmas holiday.� Starting in January, I worked the puzzle several nights a week (unless I was travelling) and most weekends�until I completed it in March.
How to do a big puzzle in a small space
The whole puzzle is 14 feet long x 5 feet high.� I do not have a space this big, so I had to do the puzzle in sections.� Since the puzzle delivers in 4 separate bags, each bag represents about 6,000 pieces and requires a space of 3.5 feet x 5 feet per section.� That cuts down the space requirement significantly, but 3.5 x 5�is still a pretty big space to set aside for a few months.� In addition, what do you do after the first section is complete?� You need another 3.5’x5′ space for the next section.� And another and another.
The answer is to work in layers.� So, if you can find a space to accommodate the 3.5′ x 5′ section of puzzle and build one section on top of the other, you can make it work.� But then what?� You still have to lay all the sections out end to end and connect them up in order to glue them.� For me, that meant laying out the completed puzzle on my basement floor, but I needed to get the completed sections from wherever I worked on them to the basement floor without any disasters.� I am over 50, so spending 3 months sprawled out on the basement floor means spending another few months in the hospital recovering from back surgery.� Not�a pleasant thought.� I need to work on a table.
That made me think about the problem a bit differently.� I did not just need a space big enough, I needed a set of portable surfaces that I could use to do each section.� As each section completed, I could then take it and the portable surface and stack it�on top of�other completed sections�out of the way, until the whole puzzle was complete.� The answer turned out to be using�cardboard.� Costco has these huge cardboard pieces cut from boxes that they use to separate palettes of goods. When they are done, they throw away the cardboard (since I guess they always have more boxes coming in).� Each cardboard slab is about 3′ x 4′, which would work if I can split my puzzle sections in half. Then I could do the whole puzzle using 8 cardboard slabs.� That is exactly what I did.� In addition, cardboard has just about the right coefficient of friction for working the puzzle.� There is enough friction that the puzzle stays in place if you don’t jostle it too hard, but not so much to prevent sliding pieces around.� Originally I thought I might need to cover the cardboard in felt, but that turned out to be unnecessary.

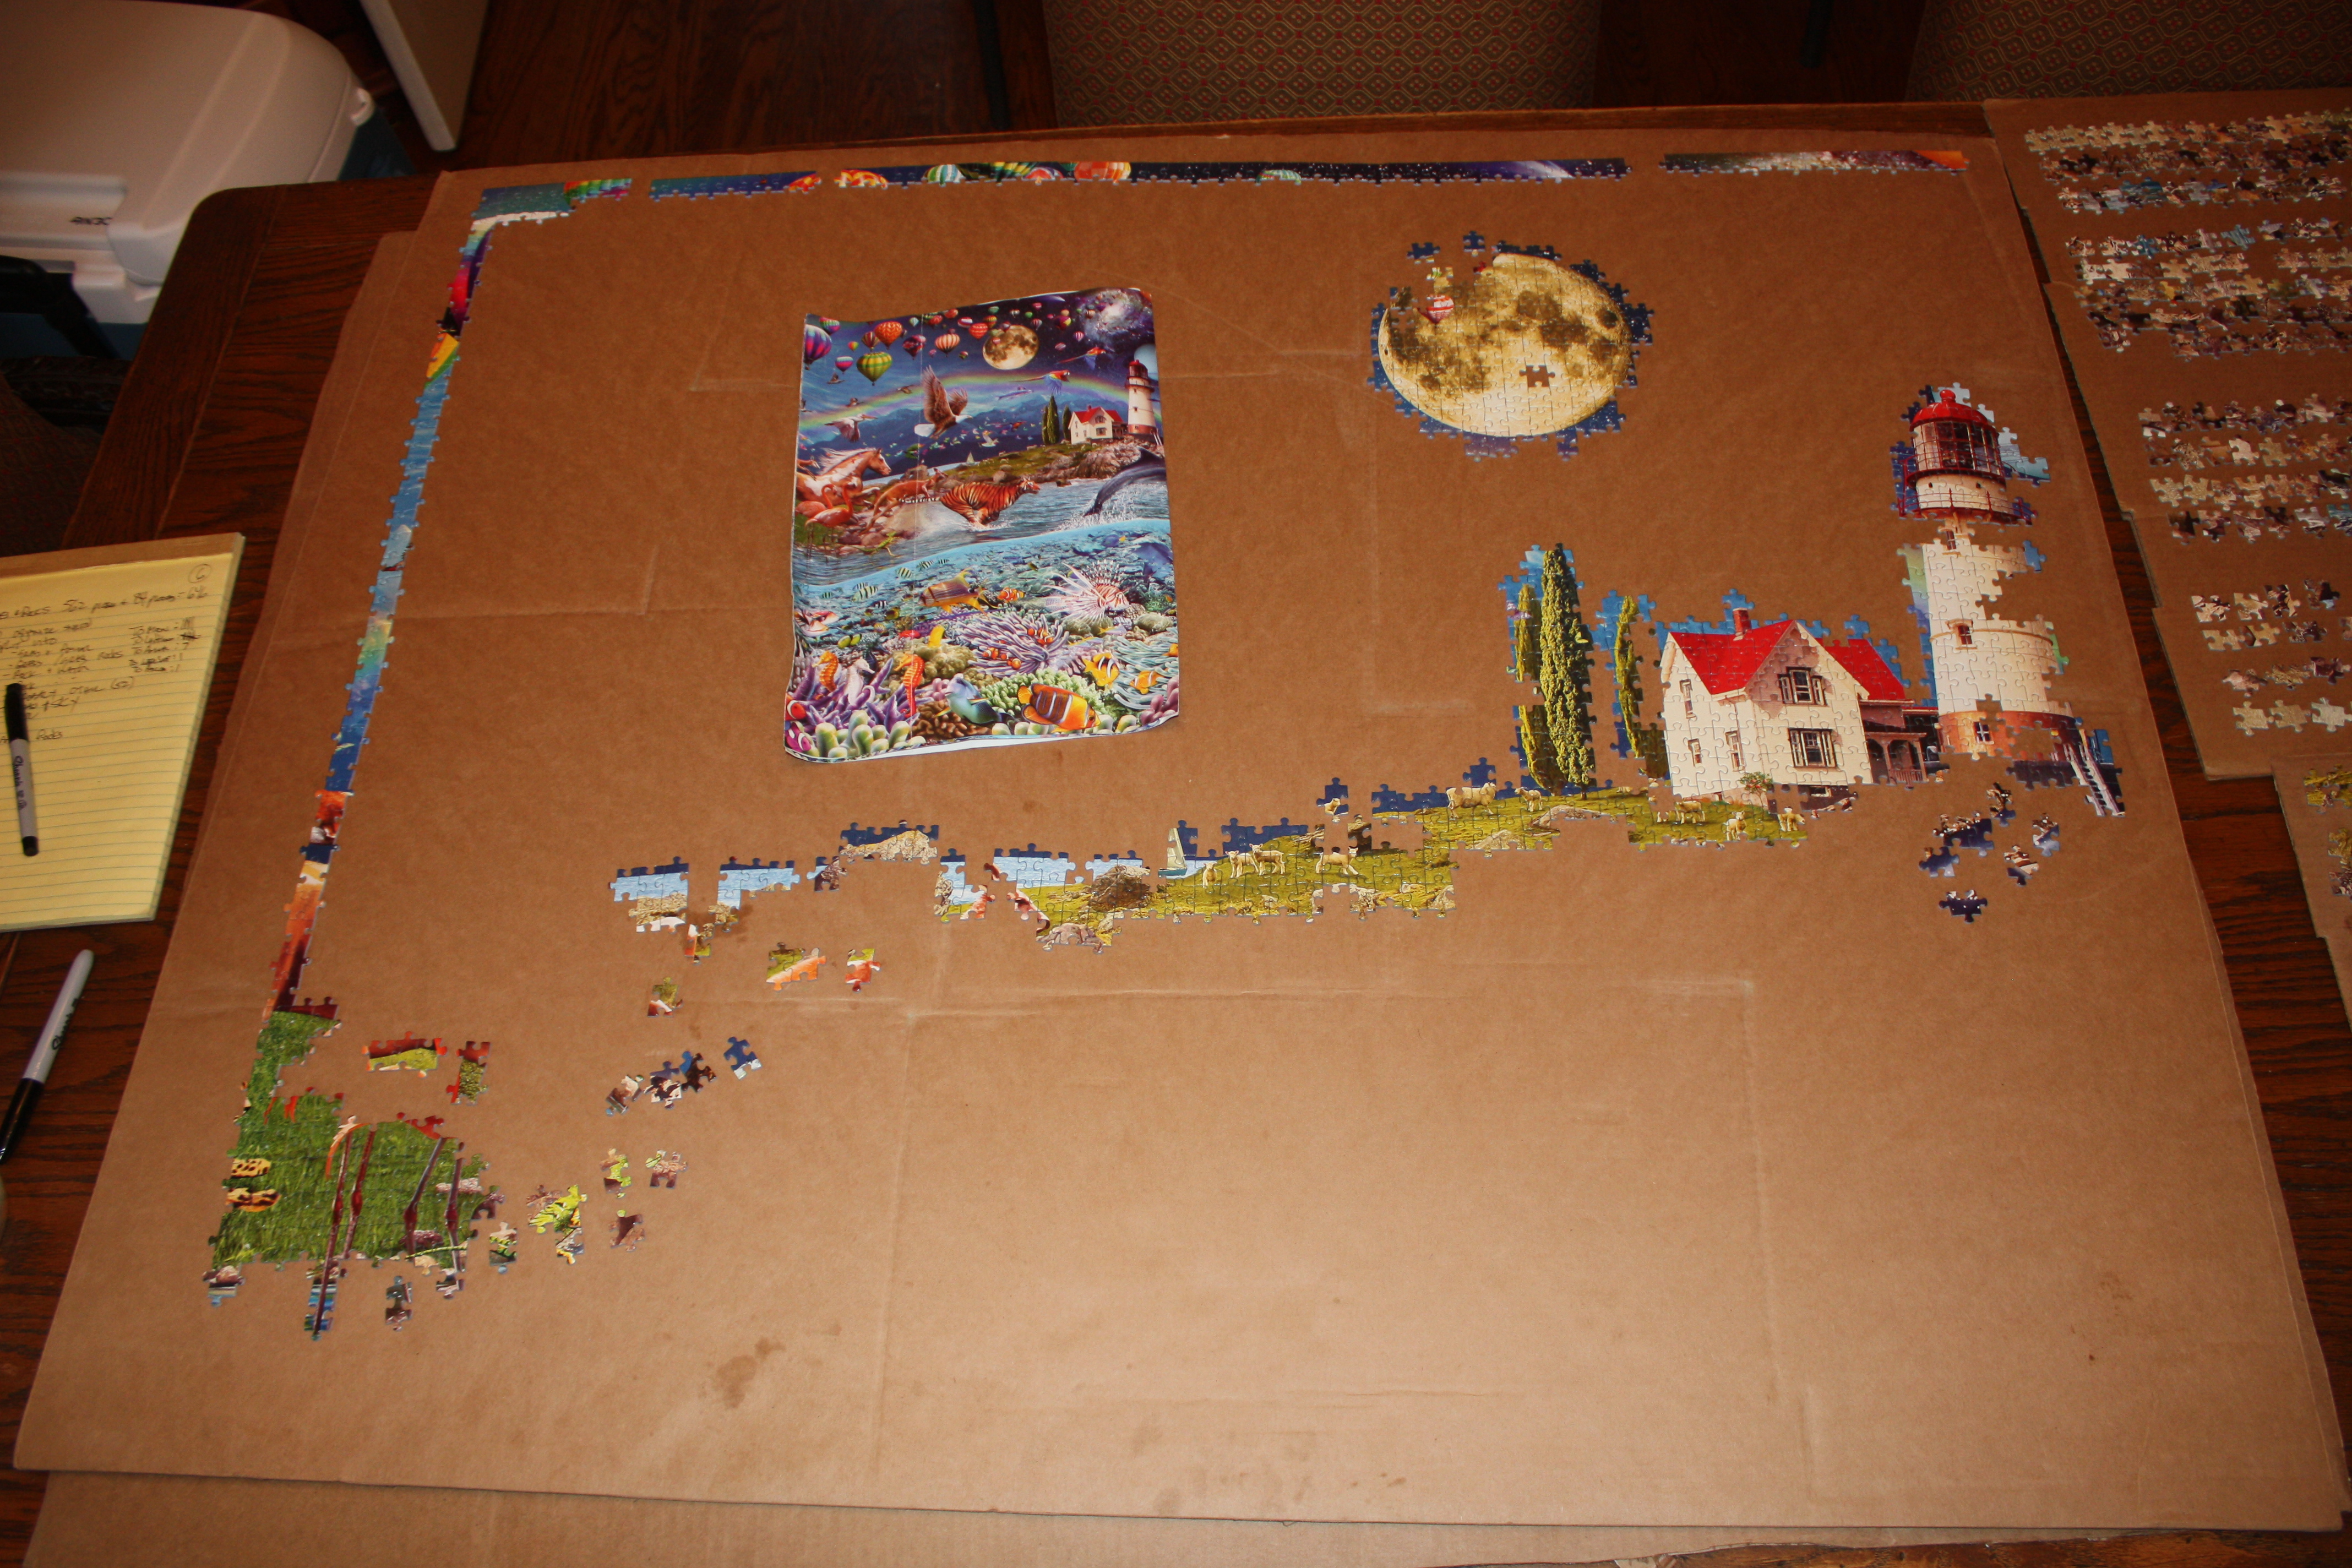
Section D on the Dining Room Table
I used my dining room table as my work area.� The table has an area of 3.5′ x 7′ (with one leaf in) and that turned out to be just about right.� I could actually fit two cardboard slabs at the same time if I needed, but I really only needed to work on one at a time, as long as I could easily separate the puzzle section into two halves during sorting.� For this puzzle it worked out reasonably well since the water line is about 60% of the way down.� So if I could sort the bag into above water and below water, I would end up with puzzle sections of 3.5’x3′ and 3.5′ x 2′, each of which would easily fit on a single cardboard slab.� Perfect!
In addition, I found out that I needed the light to be directly overhead to avoid glare.� That meant working almost exactly in the center of the table most of the time.
I know there are people out there who took all four bags and mixed them together before sorting to increase the challenge.� For me, sorting each 6,000 piece section was challenge enough.� And I have not lost any sleep over taking the easier path.
Know Your Puzzle
To do a puzzle of this size and complexity, it helps to understand the puzzle structure and the pieces.��Each piece has a specific shape and there are only so many different shapes.� In the end, you have to scan the pieces multiple times to find the�one you are looking for, so the smaller the pile you look through, the faster it goes.� My strategy is to�spend a bit more time sorting in order to save a lot of time solving.� My goal is to sort the big piles into�a number of smaller piles (of no more than 500 pieces each).
The first�breakdown is the “bag”.� That divides the� 24,000 piece puzzle into four 6,000 piece sections.� Then I try to separate out “above the water line” and “below the water line”.� That separates into approximately 3,500 pieces and 2,500 pieces.� Then for each section I try to separate out obvious elements like “sky”, “birds”, “grass and rocks”, “water surface”, “animals”, “balloons”, “fish”, “anemone”, etc.� Each time I start sorting a bag, I look at the picture to see what makes sense to separate out.� The key is to easily distinguish the pieces, so I look for tell-tale colors.� Sometimes I get it right.� Sometimes I don’t.
It turns out that colors are very, very hard to distinguish out of context.� Your eye and your brain collaborate to deceive you.� One color may look lighter than another in the picture, but actually be darker or a completely different shade when seen separately.� Your retina and brain pre-process shadows to make you believe that two colors are the same when they are not.� So you have to be careful when sorting colors that are close in hue.
I figure that sorting a 6,000 piece bag is about 8 to 10 hours of work, so I don’t want to sit there with every piece and start wondering “what is this?”.� I am comfortable getting the initial sort about 90% correct in order to move through the process quickly.� This knowledge comes into play later as I decide in�what order to attack the section.
Even though the puzzle says its 24,000 pieces, its not.��Puzzles are always a few more or a few less, because they have to fit into rectangular grid.� In the case of this puzzle, �its not actually 24,000 pieces.� Its 23,976 pieces.� I could probably have figured that out before starting, but I waited to finish the outline of the first section to do the calculation.� Each bag represents 5,994 pieces organized into an 74 (wide)�x 81 (high) piece grid.� So the whole puzzle is �296 pieces wide x 81 pieces high or 23,976 pieces.
In addition each 5,994 piece section is an identical “cut”.� In other words the�piece in each row column of one section has the identical shape to the piece at the same row/column in each other section.� That knowledge can come in handy if you want to use it.

Main Piece shapes
There are only four main�shapes of pieces (There are a few nuances which I will get to).� Each�type of piece comes in two orientations.� A very helpful bit of knowledge is that each piece shape / orientation is only present in that one orientation in the entire puzzle.� Of course it could be right-side up or upside-down (180 degrees), but it is never flipped 90 degrees.� Knowing that up front helps a lot.
The shapes are:
- Two outies and two innies across from each other
- Two outies and two innies next to each other
- Three outies and one inny
- One�outy and three innies.
Each of these shapes comes in two orientations:� The orientation pictured on the top is always vertical and the orientation pictured on the bottom is always horizontal.� It’s easy to distinguish these by the�length/width of the piece.
These four shapes (eight if you count the different orientations), account for 99% of all the pieces in the puzzle.� But there are a few odd-balls. For example:

Four-piece key
This four-piece combination is repeated six times in each 5,994 piece section.��� It is notably different from the other pieces and that turns out to be significant.

Thicker Variants
 There are also thicker variants of each piece.� When you do the math, each 74 (wide) x 81 (high) piece section is divisible into six 37(wide) x 27(high) piece sub-section arranged in a 2(wide) x 3(high) grid.� This 37×27 piece unit turns out to the be the repeating unit of the puzzle.� In other words the 23,974 piece puzzle is actually composed of��twenty-four 999 piece repeating sections, each of which is 37 pieces wide and 27 pieces high.� The thicker variants of each puzzle line the vertical edge of each section.� In other words, these are the border pieces.� The ones on the absolute end must be cut to create the straight edge.
I found this discovery very interesting.� It means that (at least for this manufacturer), the larger puzzles are created by stitching together an integral number of 999 piece (i.e. 1,000) piece puzzles, which is probably what their printer can handle.� Then for the�actual 1,000 piece puzzle, they cut the ends to make the straight edge, but for the larger puzzles, they leave the ends uncut, so that the sections�fit together.� After completing the first section, I made a “rubbing” of the 27×37 piece pattern.� When doing large sections that distinguishable by shape only (like sky), I referred to it and it turned out to be helpful.

27×37 Piece grid
Time Line
Each section of the puzzle took about 18 – 20 days.�� Half the time was spent doing the top section and half doing the bottom.� The sections are labeled “A” (leftmost section) through “D” (the rightmost section).� On each bag, there is a control number which indicates the section of the puzzle contained in the bag

Control Number for Section “C”
The control numbers correspond to sections as follows:
- 0397 – Section “D”
- 0398 – Section “C”
- 0399 – Section “B”
- 0400 – Section “A”
I started section “D” of the puzzle on 29 Nov 2013 and finished the top�on 16 December 2013
Life 24,000 piece puzzle – section D – top
I finished the bottom�part of section “D” �on 12 January 2014
Section “D”
I then moved onto Section “A”.��I finished the top half on 21 Jan 2014

I finished the rest of section “A” 9 days later on 30 Jan 2014.

Section “A”
I finished the top half of Section “B” on 8 Feb 2014

Section “B” – Top
I finished the rest of section “B” on 15 Feb 2015

Section “B” bottom
I finished the top of Section “C” on 8 March 014

Section “C” top
I finished the rest of Section “C” on 23 March 2014

Section “C” bottom
Then I moved all the completed sections to the basement and reassembled them on the floor

Life 24,000 piece puzzle – Assembled
I finished gluing and mounting the puzzle on the wall the following week.� By 30 March 2014, it was done.
Completing Section “B” (1 Feb 2014 -�15�Feb 2014)
I completed section “A” on the evening of Thursday, 30 Jan 2014.� On Saturday, 1 Feb�at 8:00 AM, I�tore open the bag for Section “B” and began sorting.� Sorting is a pretty long and tedious process, so I wanted to track my progress.� Counting the pieces as I went was certainly not going to happen, so instead I decided to track my progress by weighing the bag.� As the bag got lighter I was closer to the goal of being able to actually�put the pieces�together.
Sorting Section “B” – 8 Hours
The full bag is about 2.22 kilograms.� Given that a bag holds 5,996 pieces that means that each piece is approximately 0.37 grams.� This is not an exact method, but it’s close enough.
- After 180 minutes – 650 grams�of pieces sorted �- 29% complete
- After�270 minutes – 1044 grams sorted���������������� – 46% complete
- After 350 minutes – 1415 grams sorted����������������� – 63% complete
- After 480 minutes – 2260 grams sorted��������������� – 100% complete
So after about 8 hours of sorting at 7:30 AM on Sunday, 2 Feb 2014, I began assembling section “B”.� Before beginning the process, I had already decided the order in which I would begin the assembly.� Deciding the order of assembly up front is part of my sorting strategy.� The reason is:� when sorting you see many pieces that border two sections.� So�you have to decide which pile to put them in or whether to create a separate pile just for the�pieces that span piles.� In general, I try to put all the pieces that span piles into the pile I plan to assemble first and I try very hard to be consistent.� �I would much rather have a few extra pieces in a section than look through all the pieces in a pile only to discover the piece I am looking for isn’t even there.� Even though I have a strategy and even though I try very hard to sort correctly, its still hard and I still end up with about 10% in the wrong pile.� Oh well.� As long as I know that I only have a 90% probability of finding the piece I am looking for,�I don’t get too upset if I cannot find it.� I just move onto the next piece and come back later.
Looking at the section I decided to sort into 14 piles:

Section D
- �Edge Pieces������������������-� 55g���-���� 148 pieces (74 + 74)
- Orange Striped Fish��� -� � 8g���-������ 22 pieces
- Moon����������������������������� -��82g���-���� 222 pieces
- Light House����������������� -�� 78g���-���� 211 pieces
- Grass & Rocks������������� – 208g� -���� 562 pieces
- Water Boundary��������� -��� 39g� -���� 105 pieces
- Lion Fish���������������������� -��� 46g��-� �� 124 pieces
- Anemone���������������������� -� 149g� -��� 403 pieces
- Animals������������������������� -� 291g� -��� 786 pieces
- Balloons/Birds������������� – 235g�� -� �635 pieces
- Water Surface��������������� – 141g�� – �� 381 pieces
- Sky�����������������������������������- 380g��- 1,027 pieces
- Fish�������������������������������� – 280g�� -��� 757 pieces
- (Under) water�������������� – 234g�� �-��� 632 pieces
Although the Birds, Balloons and Fish break my 500 piece per pile rule, these are actually no problem since its relatively easy to distinguish individual balloons, fish and animals�by color and�texture.� But the 1,027 piece pile of sky was definitely going to give me trouble.

Life 24,000 piece puzzle – Sorting
My approach to sorting requires me to use the whole table.� I take a handful (or two) of pieces out of the bag and then place them in a pile in the middle of the table.� Then as I turn the pieces face up, I push them into piles arrayed in a semi-circle.� In general, I placed the sky on my right and the anemone on my left and then splay the piles around from right to left based on location� in the puzzle.� When I ran out of room, I put each pile into a zip-lock bag, label them and remove them from the table and repeat until I finish the bag.
The Edge pieces and the first fish
Assembling the edge pieces took 52 minutes.� Three edge pieces were missing.� I�sorted�them into the wrong piles, so I would just have to find them later.���� Once completing the top and bottom edges, I took the right edge from Section “A” and used it as the left edge for section “B”.� That gave me three edges to work with.
I placed the top edge on one cardboard sheet and the bottom edge on another sheet.� I split the left edge at the water boundary and placed the “above water edge” on the top cardboard.� The rest went to the bottom sheet with the underwater edge.
The Moon
I had sorted 222 pieces into the moon pile, even though I guessed there were only about 75 actual moon pieces.� This is an example of “erring on the side of the object I was planning to do first” and the fact that colors are hard to distinguish.
It took 90 minutes to complete the moon after which, I had
- 18 missing moon pieces
- 136 pieces that I thought were the moon during the initial sort that weren’t.� Of these
- 80 were likely rocks
- 19 were likely sky
- 7 were likely animals
- 19 were likely the lighthouse
- 20 were undetermined.

Section B – Moon
�The Lighthouse
After completing the moon (more or less), I began working on the lighthouse.� I started organizing at 9:12AM and finished 15 minutes later at 9:27.� I completed the lighthouse (211 pieces) after about an hour and twenty minutes at 10:47 AM.� While doing the lighthouse, I found 5 of the missing moon pieces (and put those in).� I also had:
- 16 missing lighthouse pieces
- 83 pieces that were not lighthouse, of which:
- 7 were likely balloon
- 15 were likely animals
- 11 were likely lion fish
- 2 were likely rock
- 7 were likely sky
- 36 were undetermined
As I continued I got a better and better “feel” for the pieces, which is what allowed me to sort the extras better than I could on the first pass.
Section B – Lighthouse
Grass & Rocks
I started with 562 pieces in the Grass + Rocks pile.� But added another 84 from the Moon and Lighthouse piles.� So I had 646 pieces.� I started organizing these by shape at 11:30AM and completed organizing at 12:16.� Then I took a�break for lunch.� I split the pile into smaller piles as follows:
- Grass + Animal
- Grass only + Grass / Rock combo
- Dark Grass
- Rock + Water
- Rock only
- Grass + Sky
- Tree
- Probably other (52 pieces) of which:
- 4 were moon
- 5 were lighthouse
- 7 were likely animals
- 1 was likely water surface
- 1 was likely balloon
I worked on the Grass & Rocks from 1PM to 3PM then stopped.� I picked it up the next morning – Monday,�3 Feb 2014 at about 6AM.� I worked on this section from 6AM to 9AM, then from 1-2 (lunch break), and 5-6 before running out of steam and moving onto the animals.� I had not completed the rocks and decided to move on because there were just too many uncertainties as to whether the pieces I thought were rock-like were really rocks at all.� Before moving onto the animals, I had:
- 52 pieces I put aside as “unknown”
- 31 pieces that still looked rock-like, but wouldn’t fit just yet
- 37 pieces that could be either rocks or animals
- 23 pieces that were very likely animals and not rocks.
The Animals, Balloons and Birds
At 6:20 PM on�3 Feb, I began organizing the animal pieces (by animal first and then by shape).� While organizing the animal pieces I found 75 pieces that were more likely rock than animal.� In retrospect, it was very hard to tell rock from animal by color.� The shades were just too close.� Upon further inspection some were more readily distinguishable by texture (animals have hair, rocks don’t), but even that technique was hit-or-miss.
At 8PM, I finished organizing the animal pieces and in the process found 75 pieces I moved over to the rocks.� The easiest animal to distinguish�was the tiger so I started there with the 123 pieces I had set aside, given the presence of stripes.� By 9.00PM, I had finished the tiger, missing only 12 pieces.� I had 26 extra pieces that were likely striped fish, which I put into the zip-lock bag of fish pieces.
At 9:40PM, I began working on the dolphin (60 pieces).� I finished at 10:15.� I was missing almost the whole bottom of the dolphin (which I probably mixed in with the water surface) and I had 4-5 sky pieces I put aside for later.
At 7AM on Monday, 4 Feb I began organizing the Eagle pieces.� When I got home from work at 6:30, I started putting the Eagle together.� I finished the Eagle at 10PM

Section “B” – Eagle
At 6AM on 5 Feb 2014, I began organizing the remaining animal pieces.� I pulled out the pieces that were more likely to be fish / water.� I then pulled out the small bird pieces noting how inconsistent I was on these.�The rest I sorted into:
- Likely Flamingos
- Browns that were likely the horse or kangaroo
- Horse edge (horse hair + horse/sky)
- Other
Before starting work (I worked from home that day), I was able to complete flamingos, horse and kangaroo.� I had 5 missing pieces and 6 extras.
I�finished work at 5PM and started back on the puzzle. I worked on�it for 5 hours straight (until 10PM).��I organized:
- Balloons onto one full palette (A palette is a piece of cardboard about the size of a pizza box)
- Birds onto a second palette (about half full).
I always organize the palettes by�shape (and I always�keep the same order).

Palettes
By 10PM, I had finished the balloons and birds, with some balloon corners and butterflies still missing.

Balloons and Birds
�The Sky
At 6PM on Thursday, 6 Feb, I started organizing the Sky pieces.� I had over 1,000 sky pieces so I began by breaking the sky down into smaller piles.� I organized as follows:
- Blues
- Blacks
- Deep Blues (Mountains)
- Sky pieces touching other things
- Rainbow (mostly greens)
- Galaxy (mostly cloudy)
- Rings of Uranus
It took a total of 3 hours to organize the sky pieces onto palettes according to the above groups and then by shape.� The rings were the easiest.� I finished those in 5 minutes.� The rest of the sky was not so easy.
On Friday, 7 Feb, I worked on the sky from 6AM to 9AM� and then again from 5PM to 9:30PM.� In that time, I finished the galaxy, the black sky and the rainbow.� On Saturday, 8 Feb starting at 6:30AM I began working on the blue sky.� This part was much harder as I had to depend almost exclusively on shape�to find pieces.� It was slow going.� 5 1/4 hours later, at around 11:45, I finished the sky. I had:
- 50 missing pieces, mostly in the parrot’s wings,�the flying fish, and the galaxy
- 2 missing pieces in the yellow balloon
- 1 missing piece in the moon
- A bunch more missing around the hummingbird’s wings.

Section “B” – Sky
�The Water Surface + Water Boundary
After a quick lunch, I began organizing the Water surface and water boundary.� By 2PM, I had finished organizing and completed the water boundary (the boundary between water surface and under-water).� Between 2Pm and 4PM and between 5PM and 8PM, I worked on the water surface.� I completed the water surface (completing the top section) at 8PM on Saturday, 8 Feb.
Section “B” – Top
A total of 9 pieces were missing from the top section at this point (mixed in with the fish or water, which I’d find later).� The missing pieces were:
- Back of Flamingo (1 piece)
- Tiger’s foot (1 piece)
- Light House (2 pieces)
- Eagle’s neck (1 piece)
- Flamingo’s foot (1 piece)
- Galaxy (2 pieces)
�The Anemone and Fish�(first�parts of the bottom of section “B”)
On Sunday, 9Feb at 6:45AM, I began on the bottom of section “B” starting with the Anemone.� I was able to work on these for an hour�or so before work during the week and a few hours when I got home.� By Wednesday, 12 Feb I had completed the anemone and started on the fish

Section “B” – Anemone
By Thursday, 13 Feb the big fish were done.
Under water + Coral
On Friday, 14Feb at 6:30AM, I began sorting the under-water pieces (which included the smaller fish and the coral).� By the time I finished sorting�the underwater pieces, I found all of the missing pieces from the�top of the puzzle except one.� On Saturday, 15 Feb at 6:30AM I began on the water / coral.� By 9:15AM I was down to one palette of pieces (around 500).� By 5:30PM, I had finished but there were two missing pieces.� After searching the floor on hands and knees (using mostly the sense of touch), I found one of the missing pieces.� The other missing piece was stuck to the underside of the cardboard I was using to cover the puzzle.
Eureka!� Section “B” was complete with�no missing pieces.� All in all it took 15 calendar days – about 86 hours.
Mounting the Puzzle
After completing the puzzle, I had to get the 8 individual parts (2 per section) from the main floor of the house, where I put the sections together, downstairs to the basement, where I could connect them, glue them, and finally mount on the wall.� The biggest challenge was the doorway.� The cardboard pieces are 3′ x 4′, but the doorway to the basement is only 24�inches wide.� That means I had to flip the puzzle sideways in order to get it downstairs where I could glue it.� Since it would not be glued when I carried it into the basement, it�could easily have been a disaster.
I knew that the cardboard had reasonably�high friction and of course I could place one piece of cardboard on top and one on the bottom to hold the puzzle in place while I flipped it, but would that be enough?� I used Bungee cords to hold the whole thing together.

Bungee cords
This technique worked and I was able to carry each section down to the basement with no disasters.� I then put all the pieces together before I started gluing.
Life 24,000 piece puzzle – Assembled
I did not want to start gluing before assembling all the sections together since I knew from experience that the glue causes the puzzle to shrink.� But neither could I glue the whole puzzle at once because then it would be too unruly to mount on the wall.� Ultimately I decided to mount the puzzle in 3.5′ x 5′ sections.� So before gluing, I removed one row of pieces every 3.5 feet.� This is right where the sections come together anyway.� In addition I tried not to glue the ends too much.� The reasoning was twofold.� (1) I did not want the glue to drip over the edge and stick the puzzle to�the floor (2) the less glue on the edges, the less likely shrinkage would interfere with connecting the large sections back together.
I followed the same strategy I used successfully with�the 32,000 piece Keith Haring puzzle.� I used “Master Pieces” jigsaw puzzle glue on the front of the puzzle.� When that dried, I flipped the puzzle over and used Con-Tact: brand clear contact paper on the back.� Each bottle of glue covers about 2,000 pieces so I needed 12 bottles in total.� I needed three strips of 18 inch wide contact paper to cover each section (there was overlap).� This came to a total of 22.5 square feet of contact paper per 3.5’x5′ section or a total of 90 square feet.

Life 24,000 piece puzzle – Mounting
As it turns out, the glue spreader that shipped with the Master Pieces puzzle glue was perfect for getting the air bubbles out from under the contact paper (as long as its not covered in glue).
The only problem I had during this process was that sometimes I did not quite cover every part of the front of the puzzle with enough glue (after all its clear), so when I flipped the sections over to apply contact paper, some pieces fell apart.� For the most part, these were edge pieces and relatively easy to reassemble, even from the back.� But on one section I missed a whole bunch in the middle.� That was much harder to correct, but eventually I got it.

Life 24,000 piece puzzle – Mounting
The wall I chose�for hanging the puzzle was only 9 feet before�there was a door, then one more foot, then a corner, then three more feet on the next wall.� So I had to measure and cut the puzzle in order to make it fit on the wall, skip the door and wrap around the bend.

Life 24,000 piece puzzle – Mounting
After nailing the first section�onto the wall, I fit in the row of border pieces I removed.

Then I carefully fit the next section, making sure I “snapped” them together. Everything fit perfectly.� � In addition I had to cut�out the wall sockets and light switches.� I did the cutting before the mounting.

Life 24,000 Piece Puzzle


 Puzzle - Complete")


